Saturday, August 2, 2008

Desaturation and Fade Desaturation Tutorial

. Saturday, August 2, 2008
1 comments


I really love the look of vintage photos with a touch of color. Here is an easy way to create this effect on Photoshop:

  • Rather than reducing the saturation using the percentage scale under the saturation option, click on "image".
  • Click on "adjustments".
  • Click on "desaturate". This completely desaturates (remove all color) your image at 100%.
  • Click on "edit".
  • Click on "fade desaturate". Using the scale, reduce the desaturation and add color. You also have additional options on the type of fade desaturation you want.by clicking on the "mode" drop menu.
  • With my photo, I used "normal" mode and fade desaturated at 50%.
The photo was taken in auto-focus and the portrait setting under direct sunlight.

Klik disini untuk melanjutkan »»

Monday, June 30, 2008

Direct Shot of a Sun Setting

. Monday, June 30, 2008
2 comments


This photo was taken on auto focus. No editing was done on this photo. Isn't it interesting that the sun looks more like a large star than a sun? When I took this photo, it was still quite sunny but because I pointed the camera directly at the sun, everything in the surrounding turned dark and distored the amount of brightness of the environment. This photo was taken with an 18 mm lens (wide angle shot).

Klik disini untuk melanjutkan »»

Thursday, June 26, 2008

Lens Flare and Changing the Color of Parts of Your Photo Tutorial

. Thursday, June 26, 2008
2 comments


I decided to look for a tutorial online and see if I can create something cool from something ordinary. I found a tutorial that provides steps on how to give clouds a vintage look and add a flare lens to the photo. Rather than recreating the tutorial, I decided to just link the tutorial because it's a great tutorial for a newbie like me.

Although my photo is not a picture of a cloud, I decided to see if I can use the tutorial on a photo with running water. The photo is of our waterfall in our backyard that I took a close up photo of. With this tutorial, you can change the color of select areas of your photo as well as add a lens flare (the circular bright light).
I love how it turned out. The modified version reminds me of some sci-fi sort of scene. . .like a different planet. LOL! What do you think? Anyway, try the tutorial out and see what you can come up with!!

Klik disini untuk melanjutkan »»

Sorry I've been MIA

.
0 comments

Gosh, I haven't blogged any pictures for a while. I've been busy with life and my card making. I would like to take the day to take some great shots . . .I need to be inspired. I think I'll take the time next week to drive to the coast and take some beautiful pictures. I actually drove to the coast last week but I forgot to bring my camera. It would have been a perfect time to take a photo. I'll be sure to take the time tomorrow to take a few photos!!

Not to worry. . .I'm still here!

Klik disini untuk melanjutkan »»

Thursday, June 19, 2008

Sunset Photos

. Thursday, June 19, 2008
2 comments


On Father's day, I took this photo of the sunset while I was in the car. Considering the car was moving, the photos came out great. I never thought I could take a nice sunset shot here in Temecula. It's not like we're near a sea shore or in a tropical setting. Temecula is in Southern California and no where close to the coast.
I took this photo in auto focus at a wide angle. Not bad, huh! There were no editing other than cropping the photo with these photos. I took more sunset photos but decided to just post these two. Hope you like them!!

Klik disini untuk melanjutkan »»

Wednesday, June 4, 2008

Photoshop - Changing Specific Colors of Your Photos

. Wednesday, June 4, 2008
4 comments

I was playing around with the RGB feature of Photoshop and changed part of the color of my photo.

As I learn to use Photoshop, it's made me more aware of the fact that many photos that you see may not be what they really are. . .they are edited.

To some degree, I think programs that are so good when it comes to editing, such as Photoshop, have some negative aspect to it. You no longer can take photos at face value. . .now a days many photos are edited to the point you don't know what photos are real or Photoshopped.

Anyway, here is the photo edited. I changed the orange flower to a peach flower. I like the flowers in peach.

The process of changing the color of the flower is very easy. If I have the time today, I'll create a tutorial to show you how to do it.

Klik disini untuk melanjutkan »»

Monday, June 2, 2008

Photoshop Tutorial - Stitching Photos Together Using Photo Merge

. Monday, June 2, 2008
0 comments


Hi Everyone! Today I was looking for a tutorial on how to merge or "stitch" photos together but I actually wanted to do something more advanced. I wanted to actually "blend" the photos together. As I was looking for the tutorial, I found a "basic" tutorial on how to stitch photos together so it'll be one single piece or single photo. My daughter had given me photos from her camera so I could create scrapbook layouts with them and I wanted to create a layout with 3 photos side by side without having to print them and cut them individually.

Well. . .this basic Photoshop tutorial uses the "automerge" feature to stitch photos together!! I love it because it's so dang simple.

Klik disini untuk melanjutkan »»

Friday, May 30, 2008

Levitating! Action Shot and Blurred Background Editing

. Friday, May 30, 2008
3 comments


I was playing with my the "action" feature on my camera. I had my daughter jump up and down while the camera took a sequence of shots. I chose this photo to post because it looks like she is levitating in the air. I thought it was such a cool shot. The background in the original photo was actually sharply focused but I didn't like that it didn't really show her with her body floating. I blurred the background using the lasso technique. When I have the time, I'll post the tutorial. . .maybe sometime this week! Although this shot was taken with my daughter actually up in the air, with Photoshop you could probably have a photo like this without the person actually up in the air when the original shot was taken. Now a days, you don't know what shots are actually real or edited.

Klik disini untuk melanjutkan »»

Reduced Saturation

.
0 comments


To create this "partial black and white with a touch of color" image, all I did was reduce the saturation but not completely. By doing this, I was able to add a little color to the background. I also changed the hue to "red" as opposed to its original yellow hue. This photo was taken originally in color.

I created a scrapbook layout with this image. I should have changed the hue to blue but I didn't think about until after I had created the layout.

The photo was taken at a restaurant at the winery that we ate at during the Memorial Day weekend. My son was sitting down looking distant after his father had talked to him about his plans for the future after graduating from high school this year.


Klik disini untuk melanjutkan »»

Layering Photos on Photoshop

.
4 comments


Considering this is my first time to layer images and text, as well as blending the images, I think it came out really nicely. When I have the time . . .maybe this weekend, I'll post the tutorial on how I did this on Photoshop.

This is a photo of my daughter during the Memorial Day weekend. . .we visited the winery and the photos were taken while we were there. The winery had a lot of pretty landscaping that I felt it was a great opportunity to take the photos!!

Klik disini untuk melanjutkan »»

The start of a new hobby and blog!!

.
5 comments


Hi Everyone!! I'm starting a new blog for my photos. On Mother's Day, my husband bought me a new camera - the Canon Rebel XTi and I'm slowly learning how to use it. I'm also learning how to use Photoshop!

I didn't want to post all my photos on my card and stamping blog sites because I'm not sure if readers for those blog sites want to see my photos.
I love learning new things and I think I found a new hobby. It's always a good thing to learn something new.

Photo details:

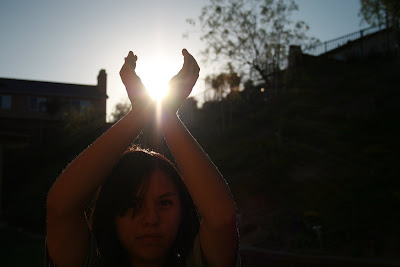
Taken on autofocus with no flash, I took a picture of my daughter with the intention of taking a photo of her looking like she is holding the sun but it did not work out that way. The sun was shining to brightly but where I was located, I could not take a picture of the sun when it was closer to setting.

The top photo was edited by cropping the original photo then reducing the gamma. This caused the foreground to darken and brighten the sun's rays. I like how it turned out. The second photo is the unedited version of the photo.

Klik disini untuk melanjutkan »»